|
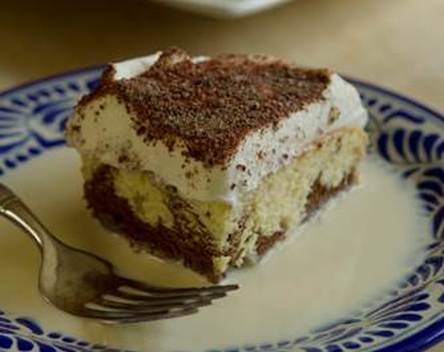
Feel like having a dessert but you can not decide if you want vanilla or chocolate cake? With a Tres Leches Marble cake you can have both! Created by Mexican chef Pati Jinich from PBS' program Pati's Mexican Table, this dessert drenched in La Lechera condensed milk, is the perfect treat to sate your cravings. ---- ¿Tienes ganas de un postre pero no puedes decidir si lo quieres de vainilla o de chocolate? ¡Con un Tres Leches Marmoleado puedes tener ambos! Creado por la chef mexicana Pati Jinich del programa de PBS Pati’s Mexican Table, este postre mojado en leche condensada de La Lechera es el regalo perfecto para mimar a tus engreídos. Marbled Tres Leches Cake By Pati Jinich *Unsalted butter, to butter the pan Cake:
Directions: Preheat the oven to 350° F with a rack in the middle. Butter a 9x13-inch baking pan and line the bottom with a piece of parchment paper. To make the cake: In a stand mixer fitted with the whisk attachment, beat the egg whites on medium-high speed until they hold soft peaks, about 4 to 5 minutes. Reduce the speed to medium and slowly add the sugar, beating until the whites hold stiff, shiny peaks. Transfer to a large bowl and set aside. Pour the egg yolks into another large bowl and beat with a whisk or fork, until fluffy and pale yellow. Add the vanilla and continue beating until fully incorporated. Gently fold the egg yolk mixture into the egg white mixture with a rubber spatula, taking care not to deflate the whites. Fold in the flour 1/4 cup at a time and mix well. The batter will look a bit streaky. In a small bowl, combine the hot water with the cocoa powder. Pour half the cake batter into another bowl and fold in the cocoa-water mixture with a rubber spatula until thoroughly mixed. Spread the vanilla batter in the prepared pan. Pour the chocolate batter on top, in a straight line down the center. With a knife or spoon, make a whirling design from one side of the pan to the other. Bake for 22 to 25 minutes, until the top of the cake has lightly browned and feel spongy to the touch. Remove from the oven and let cool. Invert the cake onto a large plate or board and remove the pan and parchment paper. Cover the cake with an upside-down platter large enough to hold the cake and the vanilla sauce and invert again so the cake is right side up. Using a fork, poke holes all over the top of the cake, so it will absorb the sauce. To make the sauce: In a large bowl, combine the three milks and vanilla and stir to blend well. Pour about 2/3 of the sauce over the cake. Don’t worry if it looks like there is too much sauce—the cake will absorb it. Cover and refrigerate for at least 2 hours or overnight. Reserve the remaining vanilla sauce. When you are ready to finish the cake, remove the cake from the refrigerator and spoon the remaining sauce on top of the cake. Make the whipped cream: In a stand mixer fitted with the whisk attachment, whip the cream and the confectioners’ sugar on medium speed until it holds well formed peaks, about 6 minutes. Spread the whipped cream over the top and sides of the cake. Garnish with the grated Abuelita chocolate. ---- Pastel Tres Leches Mármolado By Pati Jinich Ingredientes: Mantequilla sin sal para engrasar el molde Pastel:
Salsa:
Direcciones: Precalienta el horno a 350°F con la rejilla en el medio. Engrasa un molde de 9x13 pulgadas y forra el fondo con papel pergamino. Para el pastel: En una batidora, bate las claras de huevo en velocidad medio-alto hasta que crean puntos suaves, aproximadamente 4 a 5 minutos. Reduce la velocidad a medio y lentamente agrega el azúcar hasta que las claras crean puntos firmes y sedosos. Transfiere a un tazón grande y poner a un lado. Pon las yemas en otro tazón grande y bate con un batidor o tenedor hasta que estén esponjosas y de color amarillo pálido. Agrega la vainilla y continúa batiendo hasta que esté completamente combinado. Suavemente incorpora las yemas a las claras con una espátula de goma, fijándote que no desinfles las claras. Incorpora la harina 1/4 de taza a la vez y mezcla bien. La mezcla se verá un poco rayada. En un tazón pequeño combina el agua caliente con el cacao. Vierte mitad de la mezcla del pastel en otro tazón e incorpora la mezcla de cacao con una espátula de goma hasta que esté completamente combinada. Vierte la mezcla de vainilla en el molde preparado. Vierte la mezcla de chocolate encima en una raya recta en el centro del molde. Con un cuchillo o cuchara, has un diseño girando de un lado del molde al otro. Hornea durante 22 a 25 minutos, o hasta que la superficie del pastel este ligeramente dorado y se sienta esponjoso. Retira del horno y dejar enfriar. Voltea el pastel en un plato grande y retira el papel pergamino. Cubre el pastel con un plato al revés suficientemente grande para contener el pastel y la salsa de vainilla e invierte de nuevo para que el pastel este al derecho. Usando un tenedor, hacer agujeros en toda la parte superior de la torta, por lo que va a absorber la salsa. Salsa: En un tazón grande, combina las tres leches y la vainilla y mezcla bien. Vierte 2/3 de la salsa sobre el pastel. No te preocupes si parece que hay mucha salsa – el pastel lo absorberá. Tapar y refrigerar por lo menos 2 horas o durante la noche. Conservar la salsa de vainilla restante. Cuando estés lista para terminar el pastel, retíralo de la refrigeradora y cucharea la salsa restante sobre el pastel. Crema Batida: En una batidora bate la crema y el azúcar en polvo en velocidad media hasta que tome punto, aproximadamente 6 minutos. Unta la crema batida sobre la superficie y los lados de todo el pastel. Decora con el chocolate Abuelita si deseas. |
This website uses marketing and tracking technologies. Opting out of this will opt you out of all cookies, except for those needed to run the website. Note that some products may not work as well without tracking cookies. Opt Out of CookiesSearchI'M ALICIA GIBBSFaith + Family! SubscribeBROWSE POPULAR CATEGORIESMore CategoriesYoutube |

